Showing posts with label stitching. Show all posts

Wednesday, April 22, 2020

Who would have thought...Looking back at the beginning of the year

Now that Distance Learning is in full swing in Minnesota, I am busy all day long, setting up my classes, assessing student work, emailing (lots of that!), and Google meeting. As a result, I'm not scrapbooking as much. I'll share what I make as I finish.

In the meantime, I thought I'd go back to two pages I made for Simple Scrapper in January to start the year:


This page is actually really important right now. I looked back on the last year and some struggles we went through and reframed them as positives. I'm finding myself doing that a lot nowadays, of course, taking small sips of gratitude as the day progresses.

Craft-wise, I love the stitching template. It comes from a misting mask from Studio Calico, but you could achieve the same effect with a ruler and a paper piercer.

I used some flowers that I tore off a greeting card to use. I like the effect.

Next is a page about an event that broke my heart last year, the sudden death of my dog Lola:


For me, pages about loss are also pages about memory. I want to remember them, so I like recording the great things we experienced. In this case, my dog Lola in December stopped moving and eating, so we took her to the vet, where we discovered she was suffering from blood inner chest cavity, more than likely from a heart tumor. There was no end available that did not include terrible suffering, so we said her goodbyes. As she passed, I reminded her of all the terrific adventures she'd been on as a part of our family. The journaling here basically recounts what I said. That is what I want to carry in my heart.

Craft-wise, I ended my journaling with perhaps my favorite memory, one that the right hand photo shows. I think ending with the best memory is a good way to commemorate tough things.

Tuesday, March 27, 2018

Scrapbooking the same event in a new way

Many of the pages I make involve my family attending an event we got to every year. I struggle at times with the design--should I try to make it different or not? Most of the time I keep some things the same and switch the rest up. Here's an example of a page I made about our family attending the State Fair:


I always take a ton of photos at the state fair. I am sort of amazed I got it cut to 7 photos. The same: the big photo of the swing ride that I always take and I usually enlarge and highlight the boys in some way. 

For this layout, I used the January Studio Calico kit. I liked the combo of bright and delicate elements, which I thought would work well for this subject.


Here's some details, starting with the stitched circle of the boys:


I clustered a bunch of tags and stickers, layering them with dimensional stickers for greater interest.


Throughout I also added some sequins from my stash. I liked how they sort of look like candy sprinkles, the kind you will find at the fair.


So in scrapbooking the same event, don't shy away from doing it the same way. Keep your favorite design elements from previous pages, and feel free to adopt what you need to fit the design. And don't be afraid of scrapbooking just a few photos!

Friday, September 8, 2017

Ombre stitching on a scrapbook layout

The September sketches at Simple Scrapper are truly inspiring. After I made my pages for the magazine this month, I made another one based off another sketch, a page about my older boy's favorites from Hawaii. The sketch had a repeated title, and since this was about Hawaii, I decided to make the title ALOHA. And since rainbows were so frequent and symbolize Hawaii, I decided to make a rainbow stitched title.

For more interest, I decided to make the stitched title ombre, with the most intense colors at the top and the least intense at the bottom, sort of like the background patterned paper. I started by selecting rainbow DMC in three intensities:


Next, I cut the title in a blocky font on my Cameo and used the negative space to trace the title across the page.


After this, I used my paper piercer and foam pad to punch holes for stitching. I eyeballed it, but the holes are about 1/4 inch apart. When the letter went under a photo, I made the hole be at the edge of the photo.


To stitch, I did some estimates first: I figured that I would have about 3/4 of a letter for each color. I stitched the brightest first, and that served as a template for the rest of the stitching. Where I shifted into a new color in my first title, I did the same with the same colors on the rest of the page. Here's the final:


I used some Kelly Purkey label stamps in bright colors around the page along with some leftover Primas I have to embellish. Not too much was needed after the titles.


I never used the medium purple since the final A was always covered up!


Thank you for visiting! This was somewhat labor intensive, but it was fun to do while I watched TV, so I hope it inspired you to do some stitching on your pages.

Monday, July 24, 2017

Fixing mistakes when I scrapbook

This may just be me, but it seems like at lest half the time I spend scrapbooking involves figuring out how to fix my mistakes.

Sometimes I have to redo the whole page--my son swung a water bucket over my already-stitched-down photo grid, which I had to rip stitches from, reprint, and redo. Other times I need to replace individual elements--a photo, an embellishment, some paper. Still other times I switch out my original plan--remove the damaged item and replace it with something else. Most of the time, though, I end up masking the problem, like I did with this page:


I forget what had happened--I had dropped something with adhesive on it onto this photo, and the adhesive stuck quite visibly. Fortunately it wasn't over anything important, like his face, so I planned an embellishment cluster to mask the adhesive. Sometimes design follows principles; other times design follows OOPS. Here's the completed layout:


I used a lot of Project Life materials from Ali Edwards for this. The trim along the top and bottom is actually a 4x6 PL card I tried into strips and stitched down. If you look close in the middle, you can see that the right and left side letters don't match, but I picked like colors on both sides of my strips to make the mismatch harder to see.


I stitched the title down because I didn't trust the vinyl letters to stay.


I love this Venn diagram card, which sort of inspired the story I'd tell with these photos.

Thank you for visiting! I hope I gave you some ideas for fixing mistakes that don't involve redoing the whole page. Go ahead and share some of you most frightful crafting disasters.

Friday, November 25, 2016

Scrapbooking design: Starting with supplies

When I design pages, I normally start with the photos or story, then go from there. Sometimes, though, I start with a product, usually something that's been sitting around for a while on my desk. Here's one such page.

I had a sheet of washi strips stickers from Studio Calico from one of my last kits, I think. I loved the colors on them--they reminded me of autumn--so I left them around, but I could never figure out how to use them. Then I printed some small, square photos from the Renaissance Fair and decided to use them on that page. Here's the page:


I had hoped the washi would be enough to back the photos, but the photos took up too much space, so I added strips of patterned paper and stitching to fill more space. Not much space was left for journaling, so I wrote around the edge with a journaling border. Here's some details:


Thank you for visiting! What is your starting point with a page? Do you too start with photos most of the time, or do you ever start with products?
SaveSave

Tuesday, June 21, 2016

July pages for Simple Scrapper

I'm continuing my past due blogging--finally! I mentioned last time about getting caught up with teaching. I also had a couple other things that tied me up: 1) getting a newer version of PSE, so I've been transferring photos over and coming to the uncomfortable realization that my computer is too slow and old and I need to start saving up for a new, faster computer, and 2) I got Lasik. It went well, but my left eye got some oil trapped under the lend, which makes it feel like I have a dirty contact on all the time and gives me a bit of a headache. I will have to wait for my eye to absorb the oil for it to get better, which my eye is taking it's good, sweet time on. Sigh. Back to blogging, a bit at a time!

Now that I've shared my last two months for Simple Scrapper, I want to share what's in the hopper for next month:


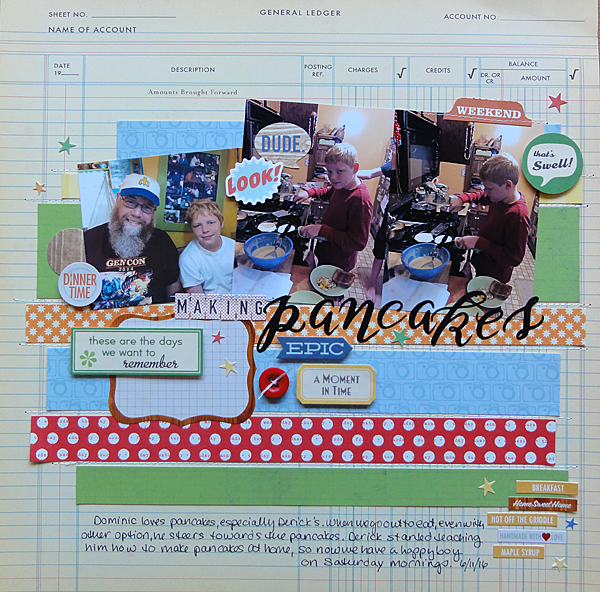
This is a page I've meant to make for a while, but it took me a while to find the sleepy photos on the right in my computer. I used scraps for the page, aside from the background paper, and I love how happy the colors are. The photo on the left I had lying around after I didn't use it on a past project, and since we were at a breakfast place, where Dominic ordered pancakes, it seemed to fit perfectly, especially since it's a page about his dad teaching him how to make pancakes.


This page came about through the story starter for July, which is about sunshine. We haven't had a lot of it this spring, which has made my garden very happy. I included some of my favorite recent photos of my garden, a couple of which I had taken in the rain. The title popped into my head; it's a song, but I don't even remember who sang it. It seemed perfect for the page. I loved stitching, but it gave me a headache looking for the holes I had punched (&#$@! eyeball).

Thank you for checking out my pages! If you have been missing scrapbooking magazines, check out Simple Scrapper; every month, membership brings a full digital magazine with lots of inspiration, plus access to story starters and sketches/templates. Inspiration is a click away!

Thursday, March 3, 2016

March pages for Scrapbook Circle

Hello! The March kit for Scrapbook Circle, Oh Happy Day, comes just as winter in the Northern hemisphere is drawing to a close, and I am delighted with how much color it holds. I bought both add-ons and more paper, I loved it so much. Here are my pages.

First, a page about my son and coding, a page where I used a lot of the main and the add-on Beautiful Day:


I drew color inspiration from his Minecraft sweatshirt--no lie. Since the kit had lots of wonderful yellows too, I added that to punch it up (and because it goes with his hair).


The background had grey misting with some yellow dots, and I altered the speech bubble to house the title, which I stamped and stitched.


Then I made  page to commemorate the pond at the Landscape Arboretum Rowan fell in as a toddler.


I love the greens in this kit, plus this cool triangle paper, which reminds me of water. I sewed the banners down instead of attaching them with the wooden hangers they came with. I like how Rowan in his red shirt pops against all the green.


Next was a page that tugs at my heart. My grandmother died recently, and these photos were ones that she kept over the years. I made this page for my dad (she was his mom) for his birthday.


For this page, I used the papers from the add-on Beautiful Day, plus my favorite embellishment, the flair from the add-on Good Vibes. Lots of embellishments from the main as well.


For the title, I was trying a play on words: love notes/love noted. I think these photos are my way of noting how much she loved us all.


There's some amazing washi with the kits--the gold in Good Vibes that I used on the water page and my final layout and this love washi that came with the main. It was perfect for the page.


Finally, a page that highlights the printables that come with the kit:


When we traveled in Boston last summer, we took to imitating the statues we saw--there were so many!--and taking photos. I used the triangular printable as the border above the photos.


The title tiny letters come from lettering from an old kit--lots of gorgeous blues in this kit.


More washi and die cuts and flair from the add-ons!

Thank you for visiting and seeing the pages I made. I hope you go to Scrapbook Circle, check out the ideas there and these wonderful kits. In addition, this will be my last month with Scrapbook Circle. It's been an inspiring two years, and I've enjoyed my time with their products. I'm glad this terrific kit was my last to play with because it was truly inspiring.


Wednesday, August 27, 2014

September reveal for Scrapbook Circle

Scrapbook Circle's September kit Here & There is now for sale! Here are my pages:


This was the first page I made. I love the look of wood grain and navy and yellow and white--it makes me think beach--so it was perfect on a page about the beach in Michigan. Lots of misting, sewing, and homemade banners. I also added stickers from the This Place add-on. Just the right splash of color.


This page was a stitch-stravaganza, if I can create a term. So much fun. Mostly the main kit, plus This Place epoxy stickers and tags and some 6x6 paper for the title from the Time Flies add-on.


Another nature page, mostly using products from the main, plus stickers from both add-ons and some 6x6 paper from the Time Flies add-on. More stitching, more layering. And more gold! I was surprised at how good gold looks on nature pages. Amazing!


I loved using both add-ons to make a sticker frame for this awesome photo of my son taking care of my friend's two-year-old. I've been wanting to make this page for a while, just waiting for the perfect photo. I mixed soft colors with masculine tones to better reflect the subject.


Another 2-pager, this time with all the girly and gold in the kits. I used both add-ons to layer embellishments along the title and through the grid. And yes, those flowers are from my garden. After the June rains, it bloomed divinely.


I hope at this point you can see how versatile the kit is. I used it on girly layouts like my garden page and on masculine pages like this one about my son and my week together this summer. Gold, black, and aqua were the colors that made this page. I used both add-ons to add a big embellishment cluster.

Thank you for checking out my September pages for Scrapbook Circle! Head on over to the circle to check out these terrific kits.