Showing posts with label cards. Show all posts

Wednesday, October 16, 2013

Back to school with a sketch

I have used sketches for my layouts for years. I started with Becky Higgins, then switched to blogs that offered sketches weekly. Now I rarely use sketches, but I do still, and I have started making my own. Here's one I made recently:


I can fit a lot of photos on this page, which I love to do, and I still have an organized feel to the foundation of the page. Here's what I made with it:


I realized that I have never scrapped our back-to-school ritual, so I made this page to commemorate it. The photos travel from haircuts to school shopping to open house.

Here are the details:


Memories Captured was a perfect line to use with back-to-school photos. It was colorful and chalkboardy without being too thematic. I liked adding the cork in homage to school corkboards too.

Finally, I made a card with the same sketch. I used the line called What a Wonderful Day for this card, which was bright and happy and thankful:


Thank you for checking out my pages! I'm curious: how much of a role do sketches play with your pages?

Monday, September 16, 2013

Starting with sketches

One assignment I had last month for Fancy Pants Designs was creating a layout based on a sketch. It went up on the blog last week, so I thought I'd share what I made! Here's the sketch:


My very first sketch I've ever made! And here is the page I made from it, one of my favorites of late:


I had these two photos of my sons from the first and last days of school. I hadn't done anything with them, so I put them together on a page and reminisced about the year. This might be a good strategy if you have old school photos to go back to. I used Fancy Pants Designs' Memories Captured Line plus some Fancy Pants Designs' cork stars. Memories Captured is one of my favorite lines of late. So versatile!

Here's some details:


I loved clustering the embellishments to frame the photos, and I tried something new and stitched the journaling lines after I'd journaled.

Then I did a card with the same sketch!


I used Memories Captured with the card as well. The thank you circles I cut out of patterned paper called "Cards." Again, fun to embellish in the white space.

Thank you! for checking out my first sketch and the projects I made with it. Please feel free to use it as inspiration, and happy scrapping!

Monday, August 12, 2013

Making cards en masse

I don't consider myself a card maker--I am not driven to make cards, particularly to use up leftover supplies, and I have to really think of how to use the smaller canvas. However,  I do make cards when needed.

Case in point: I needed to make a few thank you cards after we went on vacation to send to people who were our hosts. When I make cards en masse (three is en masse to me, LOL!) I tend to make them simple, with similar design, and with few products. Here's what I did:


I used products from the Fancy Pants Designs line Park Bench. I chose this line because its colors and patterns fit for both masculine (the greys and blues and black) and feminine (the flowers), and I had to send cards to both men and women.

I cut the base, a grey piece of patterned paper called Conversation, with my Cameo to make the rectangle with the words "Thank You" using American Typewriter font. I then adhered it to a square of yellow patterned paper called Flower Garden, and after I finished embellishing with banners and stitches, I put that square on an off-white card so that I could write a message inside. (I always forget that part when I'm designing a card!)

For the decoration, I decided to use the Park Bench banner die cuts. I overlapped them, trimming off the tops with particularly big banners, then stitched them down and stitched a frame.

Making cards in batches with not-so-different products or designs makes cards so much easier and enjoyable for me. How do you make cards--or do you? :-)

Saturday, March 30, 2013

Happy Birthday, Dad

My dad celebrated his birthday this week. Since we live half a country away, we celebrate via phone, photos, and mailed presents, but I hear he had a good day. We're planning future fishing with him and the boys. Here's the card I sent him:


I used Fancy Pants Swagger line, scraps from a page I recently made. Here's the full supplies:

Swagger Button Set / Swagger Success PaperSwagger Powerful Paper / Swagger Humorous Paper / Swagger Sticker Fundamentals / Etcetera 6x6 pad

I know male cards and layouts are hard for many people. For me, since I have all boys, I tend to make these the most, so I love this orange/grey/green combo. And I hate to say it, but with males, they don't really need a fancy card. Anything homemade, and they appreciate. Perfect for my simple style.

Monday, December 5, 2011

Ella Friends blog hop: Cards!

Welcome to the Ella Friends blog hop! This has been a wonderful year working with such a talented and friendly bunch of women. I'm honored to have been on this team.

As a final farewell, we are hosting a blog hop focusing on cards. Our ideas come from this wonderful ebook:

31 Thank You Cards, by Kimber McGray, Heather Nichols, and Kristina Werner. The book is filled with design inspirations for creating various beautiful cards. At the end of this post I have information on a giveaway that can include an ebook, so be sure to read to the end!

I took inspiration from the challenge to let a beautiful piece of paper shine. Here's what I did, on a Congratulations card:

I cut out the intricate design from a piece of Lost and Found paper from My Mind's Eye. (I never use those intricate part for layouts, so it was great to put it to good use on a card!)

I also took inspiration from another challenge: to use multiple colors of mist with a template. This time, though, I used it on a layout! The book is not just great for inspiring card ideas. I used a piece of die cut paper from a Studio Calico kit as the template, and these three mists:


Mister Huey Shine, Maya Road Buttermilk Cream, and Mister Huey Lemonade. I laid down the Buttermilk cream heavily because it's the lightest, followed by a smidge of Lemonade, then a dousing of Shine.

I turned the template sideways for an interesting angle:


Then covered the edges with paper to color only the inside of the template:


Here's the design (upside down):

When I looked at the LO the next day, I thought the top looked too empty, so I decided to add another misting with the same template.

Since I had already adhered the rest of the LO, I covered them up with wax paper to prevent mist seepage.


And here's the finished LO, complete with additional details:

Design inspired by cards! I may go back and stitch lines under the journaling. Still deciding.

Thank you for visiting my blog! All of you can use the code CARDHOP one time for a $2 discount off of the ebook 31 Thank You Cards; code expires 12/10/11.

Now for the giveaway: Please leave a comment telling me what you like to do with cards--design wise, product wise, you tell me! Your comment puts you in the running to win a Gift Card to Ella Publishing, which you can use to buy this wonderful ebook. I will keep comments open until Wednesday, December 7 at 8 P.M. CST.

Thank you for visiting my blog! I hope you can stop by again. Now please visit the wonderful creations at the blogs of the other Ella Friends participating in this hop:


Have a great Monday!

Monday, May 23, 2011

Random May bits

I have been a pathetic blogger this week, undermined by business: end of the school year, projects for Ella and GCD Studios, and a busy as you-know-what week that will doubtless show up in a page about me soon.

But count my blessings, at least this didn't happen in Maple Grove yesterday. My prayers are going out to everyone affected.

We went to a wonderful wedding this weekend at the arboretum. The readings were terrific, including Oh, The Places You'll Go!, and my son was the first to recognize the recessional as a song from Kung Fu Panda (Oogway's Ascent):


(Note: same clothes as Easter. I don't do dresses.)

Here's the wedding card I made using GCD Studios Simply Surrender:


I liked layering all the different papers (that's me), but this time I also trimmed the die cut paper to layer too. I haven't done that before, so it was nice to see other ways of using die cut papers aside from the whole sheet.

Back later this week once my head comes up for air!

Thursday, January 6, 2011

Warm Wishes

This week's sketch over at Sketch Support is for a card, and here's the card I made, which is posted today:


I have to admit, I don't make a lot of cards, but I had so much fun with this sketch. The snowman idea just popped into my brain the second I saw the sketch, and I thought I'd use felt too, since I had the phrase "Warm Wishes."

I had an initial idea of mixing felt circles with patterned paper, as I had some nice yellow, blue, and gray winter paper, but when I used them, the snowman looked either diry (blue or gray snow) or worse (yellow snow). So I stuck with the felt, though I wish I'd glued the felt to white paper circles first before adhering it to the card--it would've made the glue a little less visible. Still, the recipient of this card is not going to gasp and say, "Oh no! Glue!" Hopefully they'll smile and say, "Aww!"

And speaking of snowmen, you'll see another one for the project I did for the sketch next week!

Saturday, September 11, 2010

Thank you, Genius Bar

My computer is home and much, much quieter. Thank you, Apple Geniuses. I'll gloss over the fact that a part broke within its first 6 months...

I scrapped this week anyway, then had to put a bunch of pages aside, having no computer with which to journal. I could have hand written the journaling, I guess, but I had a lot to say and not much space, so I thought the computer was warranted.

I've finished about half of what I started. Here's what I did:


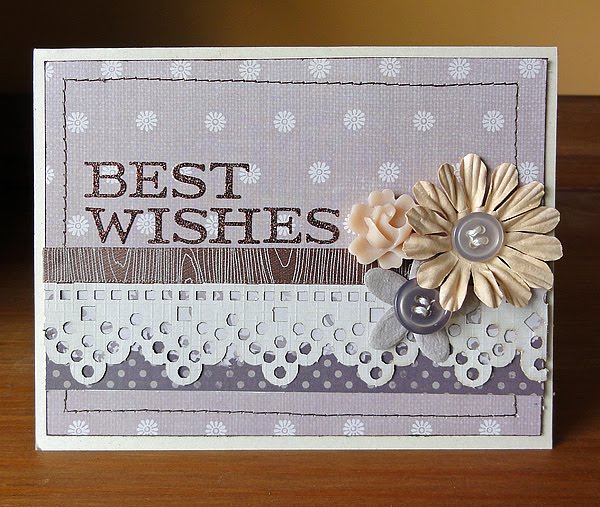
First were a couple cards, a sympathy card for a friend and a birthday card for my Grandma. I hate making sympathy cards; I guess I should make them in bulk when they're not needed, because I hate having to make one when one is needed.

The birthday card uses one of my favorite new things, a Stampin' Up! Embosslit die, which cuts and embosses on my Big Shot at the same time. Niiiiceee!

I ended up with over 12 pages out of my August Studio Calico kit, plus still lots of stash stuff left. This page came from some of the last stuff: I used number cards, letters, and gray paper. Also used The Color Room's color combo from last week. Which I missed the deadline for because of my computer. X%&#!


I have given up taking good pictures of my boys during their swim lessons (weird lighting and lots of motion), so I strive for a good shot after lessons on the pool deck. This year Dominic excelled, passing level two with flying (or swimming, as the case may be) colors. Since it was such an exuberant event for him, I pulled out some exuberant product: Fancy Pants' Rusted Sun line. I like that I used no real embellishments on the page, just patterned paper (OK, and letter stickers and a date sticker), but still managed dimension.

I love that gap-toothed grin...

This was a page using this week's Studio Calico sketch. I've been meaning to do the page since I got the kit. It came with clothes chipboards, including dresses. Nice. I have boys, and I hate dresses. This may be scrapping for the sake of scrapping, but I made a page about my loathing of dresses.

I covered the chipboard dresses with the paper whimsies from the kit, trying hard to avoid the flower centers ending up as a bullseye on the crotch of the dresses. That was tough. I then strung them on a clothes line and added some elegant dressy ladies which I would never otherwise use.

So, progress has been made in finishing up a glut of pages. Still finishing the August Project 12 layout and the page which, if my husband sees, may lead to his divorcing me.