Showing posts with label creative process. Show all posts

Wednesday, September 25, 2013

Scrapbooking 10 minutes at a time

I scrap every day in varying amounts. If I'm lucky, I have no papers to grade, my boys fall asleep immediately (wouldn't THAT be great--can you imagine!), and no pressing needs come up, so I can get a couple hours of scrapping done before bed. When the school year is in full swing and my boys are--well, acting like themselves--then I can maybe get 10 minutes here and there.

I've gotten adept at using those ten minutes well. Here's a page I made over the past week where I purposefully only scrapped it 10 minutes at a time, taking pictures along the way so that I could share my process. The photo was not a great one--just a drawing and a book my son had on the kitchen floor--but the story was one I wanted to preserve: this book is the same book that I used to draw from as a child, Ed Emberley's Make a World, if you're curious. Here goes:

Step 1: Select products.


Like I said, the photo wasn't great, so I wanted some bright, fun colors and artsy products to highlight the story. I pulled various products from my September Studio Calico kit that I thought would work, spread them out, and just looked at them as I passed by over the next day.

Step 2: Make preliminary design decisions

I decided to use a neutral background and layer some bright colors on it as a photo mat. I trimmed those photos and played around with photo placement and imagined techniques I might try. (I didn't end up stitching, but I kept this template out to imagine what it would look like if I did. I finally decided no.)

Step 3: Get crafty

Though I love the Fancy Pants Designs letter stickers, I used them to mask the title when I misted. (It utterly KILLED me to have to throw away this A, R, and T after I misted. Those are the letters I run short on!) I used my Cameo spatula to pry the letter stickers off after I misted, and this is how it looked on the page:

  
Step 4: Journal

(I forgot to take a picture of this step! Rats.) I was going to print the journaling in kraft and cut it in strips, sort of a tone-on-tone design. Unfortunately, this kraft is lighter than most, and I don't have any that matches, so I had to scrap that idea (pun intended). Instead, I measured lines in pencil, journaled on them in ink, then used ink to trace over the lines freehand.

Step 5: Play around with embellishment possibilities
 

I love to embellish, so I pulled stuff from my stash as well as the kit and lay them near the page, just so I could imagine  what it would look like.

Step 6: Finish the page

I machine stitched in a couple places, then created two embellishment clusters by the photo and along the bottom. Here are the details:


And there's my page that I made 10 minutes at a time! I'm satisfied with it. I had fun making it, and it tells the story I wanted to tell. I hope this gives you ideas of how to fit scrapbooking into your life, even if it's in 10 minute increments!

Saturday, October 6, 2012

The life and death of creative ideas

I have a notebook with pockets that I bought at Target where I keep track of my creative ideas. I like the pockets so I can keep memorabilia or master lists I might need; I can also keep photos in them to plan pages if I'm going somewhere (like taekwondo to watch the boys). I post some sticky notes on the inside cover and list page ideas when I get them, either spontaneously or when I'm browsing photos on PSE, deciding what to print. 

I did that with the following page:

I was poking around an iPhone app I use when jogging, MapMyRun, and discovered I could find out how far I'd run this past summer. When I added it all up, I was surprised to find I'd run 131.27 miles. (Somewhere on the trails by my house I'd left 12 pounds behind.) I needed to make a page about this accomplishment, so I printed an iPhone photo from a 5K my family ran in August (I didn't want to take a photo special) and made the following.


I had these big numbers in a Studio Calico kit and decided to use them for this page, along with the map and number paper. (Note: I rounded down because the big numbers only came with one digit. Guess I should have run another mile!) Here's some details:


I used this page on the Thinking Through Design lesson on adding dimension to pages. You can see how many accents I popped with Dimensional stickers. Even the photo!

Back to the creative journal: When I finish pages I've logged in my journal, I cross them off the list. But some ideas stay on that list for a long time. A loooong time...

What happens with those ideas? Sometimes I just let them go. I had been excited to do them once, but not anymore. I might even have printed photos for them, but I think it's OK to let creative ideas die. They die a good death. It's OK.

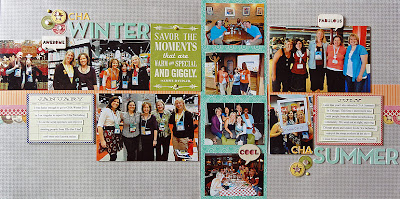
Other times I leave them on there and the page eventually gets made. Here's one of them:


I went to CHA Winter and Summer in 2011 representing Ella Publishing and had printed photos, intending to make a page about each event. I never did, though I made minis of both. That will usually make me abandon the idea, but this one kept nagging at me. I wanted to make the page! So I pulled out some Jillibean Soup papers I'd pulled when I intended to apply for the design team( I never did--regrets! Ah well, next year) and got to work.

Here's some details:


Please know I corrected that errant gem!

The Studio Calico word bubbles I backed in pink paper.


I liked using the photo for part of the title and the calendar for the journaling. By the way, those were mistable Thickers. I bent them prying them off my cardboard box I mist in. Next time I'll put them on wax paper in the box. Hopefully they'll bend less.

So here's my question to you: how do you keep track of ideas? How do you plan? And how about letting creative ideas die--do you? Or do they get life support? :-)

Thursday, May 13, 2010

One more thing

I got some happy mail today: my returned layout from the February Scrapbook Trends magazine, along with some scrap goodies:

Lots of Hambly, plus some My Mind's Eye. Mmmmm...

The layout I made for today's LOAD is a scraplift from Studio Calico. Here's the layout I lifted by Jennifer T: I liked the design, even though it was made for a girl. I thought it would work for a boy too, so I switched out the accents and colors to make it more masculine.

When I finished the layout, I felt like it was still...unfinished. In particular, I thought it needed a stronger line down the middle. So I pulled out my sewing machine, set it to zig zag, and began.

Let it be known that I hate to sew. It seems to me that every time I sew, disasters occur. Like, say, the row of brads I put in a layout hooking onto the machine, snagging, and refusing to budge. So I try to loosen it, only to rip the page.

X%&#!

This is a great example of how my most creative and imaginative techniques come from the necessity of covering up mistakes. There are no mistakes, only creative opportunities. So to cover up the rip, linear ol' me set the machine to straight stitch (this time gently holding up the brad part of the page) and stitched row after row of wavy straight stitches. It mostly covers up the rip, or at least distracts one from trying to look for it. Here's the end result:

Job well done, with only a teeny bit of sewing swearing.

Thursday, September 3, 2009

Designing with Sketches

I tend not to use sketches because for me they take a long time. Case in point: Tonight I was working on a single photo layout and was stumped, so I pulled out a few magazines and books and started searching through them for single photo layout ideas. Nothing worked with the photo I had. I put aside the sketches, pulled out some product, spent the same amount of time designing and finished the layout sans sketch. I'll share that layout tomorrow.

Even though I don't use others' sketches, I do make my own. Here's a couple pages from my sketch book:


You can see that I do not draw to scale, so I have to rework them as I do them. When I finished, I write "DONE" on it. And as you can see on the right, I sometimes use my sketchbook for a to-do list.

This first layout is the sketch from the upper left:


I switched where the red photo block would go, dropped a picture, and added embellishments.

The next is the sketch from the upper right:

It transformed from a 12x12 to an 8 1/2x11 layout based on the orientation of the photos.

The next two use sketches, but from pages I didn't show. This first used products from a kit from Scarlet Lime:
I can't tell you how much my son liked this layout. He studied it, and then I found out why: He reproduced his Hot Wheel contraption.

This next is a small page about the five things I do every day that leave me having a good day:
I had some Making Memories Flower Patch papers out to get ready to scrap Easter, but I thought they looked good with my purple shirt. And I never scrap purple, so green it was.

That's my process with sketches. I'll post two more pages tomorrow; I did them without sketches, but I like the end product on them.

Monday, August 31, 2009

My process, sans sketch

Today was my first day back to school for workshops. We did a great activity that I am going to turn into a page that I'll share with you tomorrow. Right now I'll share my scrapbooking process.

I sometimes sketch--I rarely use someone else's, mainly because I find it hard to search through sketches for one that will work with my photos and stories. It's easier for me to make my own. Some of my favorite pages, though, are created when I just start cutting without a sketch.

Here's an example. I had some photos of my son, occupying his time while waiting. I thought I'd scrap my admiration for his ability to fill his time without video games (he has none). I trimmed the photos down to wallet size and matted them on white.


I liked them lined up with a tilt, a little like Lisa Dickinson does so well.

Next I found same papers I like. I took my inspiration from the photos--his sweatshirt has some teal and orange in them, so I went through my patterned paper stash until I found some I liked: Bazzill Swiss Dot in teal and some Basic Grey Marakesh (sp?).


By the way, that is a lap desk my layout is on--I have a scrap space, but I scrap on a lap desk to be near the family.

I trimmed the patterned paper to make a little "home" for the pictures. At this point I envisioned a little stitched border, so I pulled out the sewing machine and stitched around each rectangle of patterned paper.

Now I needed to start thinking of embellishments. In particular, I thought I needed a strip of ribbon to clearly separate the patterned paper; black was my choice, since black often grounds layouts. I went down to my scrap space and also pulled anything that looked like it shared color (teal or orange) or feeling (a little whimsy):


I didn't end up using everything I pulled; in fact, I got out my stickers and rubons to play around too. I saw the title belonging best on the ribbon, and to make it easier to see, I thought I should put it on a tag of some sort. I laid stuff down on the page until I found a combo I liked.


I didn't see an easy place for the journaling; I thought I might type it on white, cut it in strips, and place it under the title, but I thought that would be too distracting from the rest of the layout. Instead, I just wrote it, using the dots as journaling lines.

There it is--how I create without a sketch.