This is my last GCD Studios post. I had a wonderful year with the team, and I am so excited to share the wonderful products in this line.
I'd like to share a technique I used recently to dress up a page with lots of patterned paper bits.
The spring here in Minnesota has been so gorgeous, I felt the need to scrap some spring photos. I pulled an unscrapped photo from last year--remember last winter and how welcome spring was?--and paired it with with the lovely Bonjour line. I was inspired by these papers:
The blues and greens are lovely spring colors that I can use on a page about my boys. The colors made me want to pull out some mists and use them too.
First, I set up the layout of the page. I grabbed a template from Pink Paislee to make the background:
Next, I misted over the template in light blue.
I wanted to use two other colors of mist, but only inside the template. To cover the paper above and below the template, I taped some wax paper to it, then misted with green and brown:
Next, I added some patterned paper strips. I also wanted to add patterned paper to the misted circles, so I used the misting template to trace and cut a scrap paper template. I used this scrap paper template to trace and cut out small pieces of patterned paper to glue over some misted spots.
Finally, I added some other shapes and brads just because.
Here's what the final page looked like:
I hope you enjoy using your templates to add a fresh mix of patterned paper to your page in little bitty doses!
Showing posts with label techniques. Show all posts
Monday, April 2, 2012
Monday, March 26, 2012
Yellow and brown and blue
I thought I'd share a sports page I made using non-sports papers, using some amazing GCD Studios papers.
My younger son loves sports, even though he's not a formal participant right now. I have a collection of photos I've taken of him messing around with various athletic gear, so I decided to put them together on a page.
I LOVE this yellow paper "Sunswept" from the line Splendor:
It reminded me of the colors in the basketball photo of my son, so I used this paper as the backdrop. I then picked a bunch of brown and dark yellow papers from the same line to add to the page, "Letter Tiles," "Zig Zag," and "Heirloom." To add some contrast, I picked this energetic paper "Woven Chevron" from Splendor as an accent paper:
I hand cut a line and added it to the middle of the browns.
I wanted small bits of blue throughout as well, so I punched tiny circles from the B side of "Pink Flora." I added them to the yellow paper and did some hand stitching. Here's how the page ended up:
I love how versatile this collection is! Have fun playing with Splendor, even for some pages that you might otherwise only use themed products on.
My younger son loves sports, even though he's not a formal participant right now. I have a collection of photos I've taken of him messing around with various athletic gear, so I decided to put them together on a page.
I LOVE this yellow paper "Sunswept" from the line Splendor:
It reminded me of the colors in the basketball photo of my son, so I used this paper as the backdrop. I then picked a bunch of brown and dark yellow papers from the same line to add to the page, "Letter Tiles," "Zig Zag," and "Heirloom." To add some contrast, I picked this energetic paper "Woven Chevron" from Splendor as an accent paper:
I hand cut a line and added it to the middle of the browns.
I wanted small bits of blue throughout as well, so I punched tiny circles from the B side of "Pink Flora." I added them to the yellow paper and did some hand stitching. Here's how the page ended up:
I love how versatile this collection is! Have fun playing with Splendor, even for some pages that you might otherwise only use themed products on.
Labels:
Dominic,
GCD Studios,
scrapbooking,
stitching,
techniques
Friday, March 23, 2012
Scrapbooking screw-ups
My post the other day made me think of my biggest scrapbooking mishaps, so I thought I'd share them with you.
If you've scrapped with me before, you know my mantra: There are no mistakes in scrapbooking, only unplanned opportunities for creativity. Heaven knows I've had plenty of chances to put that mantra into practice. Here's some of those moments:
1. Torn paper after moving stickers. Most recently, I lifted stickers after I'd adhered them and they slightly tore the paper. Confession: I do this all the time. I'm the only person in the world that's happy when Thickers don't adhere well.
2. Mystery Goo. I made this layout for Sketch Support, then when I went to photograph it a day later, I noticed Mystery Goo. It had ruined some photos and splattered on the background. NO CLUE what happened, though I wonder if my younger boy had sprayed a lot of leave in conditioner in his hair, thinking it was hair spray and then Dripped. I replaced the photos, but was in turmoil about the other splatters until Lisa Truesdell on Studio Calico suggested I spray the whole page with Mister Huey Shine, which is now at Archivers. Very nice solution! Pun intended.
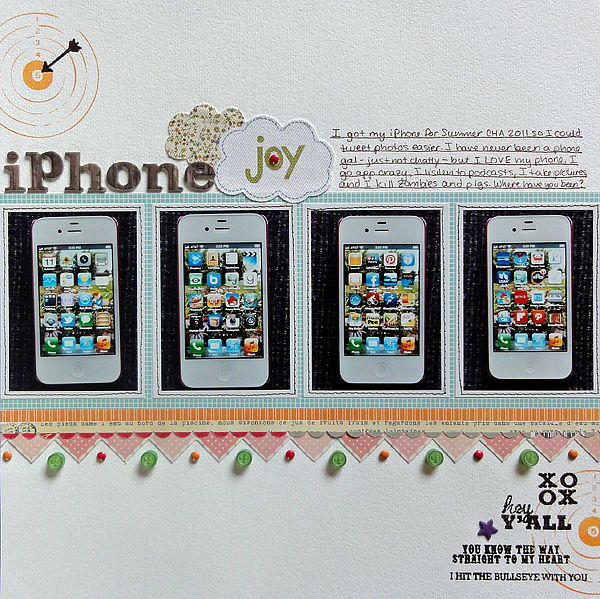
3. Messed up embossing. Right now I love to stamp and emboss, but I tend to make a mistake with the stamping so that the image takes less ink and therefore less embossing powder, thereby being Screwed up. Here's an example:
I did this page for Twelve, commemorating a Thing, in this case my iPhone. I thought the bullseye stamps and more particularly the words would express my affection well. They did, but I stamped AFTER I'd adhered the dimensional accents. I hit them when stamping, meaning less ink, meaning no embossing powder on parts of the image.
X%&#!
I used a Zig pen to fill in where there was no powder.
4. Water on a layout. This was a big oops that was totally not my fault, aside from the fact that I gave birth to the culprit. I blogged about it on this post, and I did repair the page well, but let's just say I'm VERY sensitive about my sons touching anything with water near my pages.
5. Mist oops. If you mist, you will have to deal with oops. In this case, I messed up one project on a page I was making. I loved the paper, and I had two pieces, so I did it again and saved the mistake. I used the mistake on this layout, covering most of the misting. Covering is a good way to deal with mistakes. (If you're curious, the misting oops involved too intense color.)
6. Stitching screw-up. I like to stitch around the exterior of a page, especially if the exterior looks white and empty. I tried that here, but I must have wound my bobbin badly, for the stitching had poor tension: some stitches had wide loops showing up above the page. On top of it all, I ran out of bobbin thread and didn't notice for half a page. To fix it, I ripped some stitches, pulled threads tight and taped it on the back, then stitched again and again to mask the irregularity. When it looks bad, make it look like you did that on purpose. :-) Be whimsical.
7. Crushed paper. This was a rarity. I scrap in my living room, in an easy chair, on a lap desk. I keep my projects there in progress. Miraculously, my boys have never messed up a page, barring the water mess up. My pets haven't either, except some supplies that disappeared recently that I think my dog ate. The biggest page mess up happened because of me. I tripped over the dog, fell on the page, and crushed the background paper.
What could I do? Nothing, really, because the paper was ruined, so I removed the photos. (Helpful hint: when you need to remove photos from a page, flip the page and pull the page off the photos. You'll save the photos and probably save a lot of the background paper too. If you remove the photo from the page, you'll bend them and ruin them.)
I then replaced the ruined paper with another one, and truth be told, I liked it better. Here it is:
I hope you click on the layout and read the journaling, if you can. My mother-in-law was an amazing woman, and an incredible artist. She studied photography with Ansel Adams. I am so glad I had the chance to interview her about this before she died. That interview was definitely NOT a mistake, so I invite you to interview an older relative about something you know a little about but should know more about.
If you've scrapped with me before, you know my mantra: There are no mistakes in scrapbooking, only unplanned opportunities for creativity. Heaven knows I've had plenty of chances to put that mantra into practice. Here's some of those moments:
1. Torn paper after moving stickers. Most recently, I lifted stickers after I'd adhered them and they slightly tore the paper. Confession: I do this all the time. I'm the only person in the world that's happy when Thickers don't adhere well.
I don't think anyone will notice. Except maybe me, but in a few years, even I'll forget.
2. Mystery Goo. I made this layout for Sketch Support, then when I went to photograph it a day later, I noticed Mystery Goo. It had ruined some photos and splattered on the background. NO CLUE what happened, though I wonder if my younger boy had sprayed a lot of leave in conditioner in his hair, thinking it was hair spray and then Dripped. I replaced the photos, but was in turmoil about the other splatters until Lisa Truesdell on Studio Calico suggested I spray the whole page with Mister Huey Shine, which is now at Archivers. Very nice solution! Pun intended.
3. Messed up embossing. Right now I love to stamp and emboss, but I tend to make a mistake with the stamping so that the image takes less ink and therefore less embossing powder, thereby being Screwed up. Here's an example:
I did this page for Twelve, commemorating a Thing, in this case my iPhone. I thought the bullseye stamps and more particularly the words would express my affection well. They did, but I stamped AFTER I'd adhered the dimensional accents. I hit them when stamping, meaning less ink, meaning no embossing powder on parts of the image.
X%&#!
I used a Zig pen to fill in where there was no powder.
4. Water on a layout. This was a big oops that was totally not my fault, aside from the fact that I gave birth to the culprit. I blogged about it on this post, and I did repair the page well, but let's just say I'm VERY sensitive about my sons touching anything with water near my pages.
5. Mist oops. If you mist, you will have to deal with oops. In this case, I messed up one project on a page I was making. I loved the paper, and I had two pieces, so I did it again and saved the mistake. I used the mistake on this layout, covering most of the misting. Covering is a good way to deal with mistakes. (If you're curious, the misting oops involved too intense color.)
6. Stitching screw-up. I like to stitch around the exterior of a page, especially if the exterior looks white and empty. I tried that here, but I must have wound my bobbin badly, for the stitching had poor tension: some stitches had wide loops showing up above the page. On top of it all, I ran out of bobbin thread and didn't notice for half a page. To fix it, I ripped some stitches, pulled threads tight and taped it on the back, then stitched again and again to mask the irregularity. When it looks bad, make it look like you did that on purpose. :-) Be whimsical.
7. Crushed paper. This was a rarity. I scrap in my living room, in an easy chair, on a lap desk. I keep my projects there in progress. Miraculously, my boys have never messed up a page, barring the water mess up. My pets haven't either, except some supplies that disappeared recently that I think my dog ate. The biggest page mess up happened because of me. I tripped over the dog, fell on the page, and crushed the background paper.
What could I do? Nothing, really, because the paper was ruined, so I removed the photos. (Helpful hint: when you need to remove photos from a page, flip the page and pull the page off the photos. You'll save the photos and probably save a lot of the background paper too. If you remove the photo from the page, you'll bend them and ruin them.)
I then replaced the ruined paper with another one, and truth be told, I liked it better. Here it is:
I hope you click on the layout and read the journaling, if you can. My mother-in-law was an amazing woman, and an incredible artist. She studied photography with Ansel Adams. I am so glad I had the chance to interview her about this before she died. That interview was definitely NOT a mistake, so I invite you to interview an older relative about something you know a little about but should know more about.
Sunday, October 23, 2011
School preparation
When I think of back-to-school, I think supply shopping, clothes shopping, and open house; really, though, we prepare for school in other ways as well. This summer my boys started reading the Harry Potter books, with a little help at times from my husband and me. When I saw him reading to my younger boy, I pulled out my phone, took some photos, and made this layout:
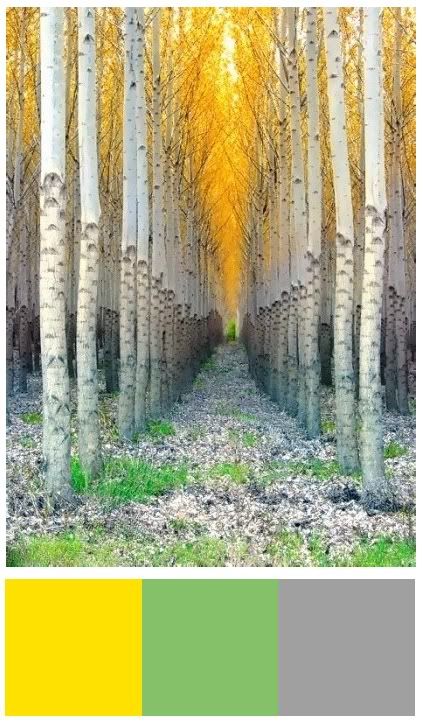
I used the following color inspiration:

Isn't that photo beautiful? The shot paired with the colors made me think tranquility, perfect for these shots of these two together.
I used the following GCD Studios products:

Homespun Mod from Homespun Chic

Our Family Tree from Sweet Surrender

Lovely Garden from Soul Food
Die cut borders from Homespun chic

Metal Rimmed Glass Brads from Soul Food
I added some stamped, embossed borders of bookshelves to frame the photos:


I also added some paint, mist, and hand-stitching to draw attention to the title:

Thanks for looking at my page; if you're making some school pages right now, try doing some of the things your family does outside of the classroom that involves learning!
I used the following color inspiration:
Isn't that photo beautiful? The shot paired with the colors made me think tranquility, perfect for these shots of these two together.
I used the following GCD Studios products:

Homespun Mod from Homespun Chic

Our Family Tree from Sweet Surrender

Lovely Garden from Soul Food
Die cut borders from Homespun chic
Metal Rimmed Glass Brads from Soul Food
I added some stamped, embossed borders of bookshelves to frame the photos:


I also added some paint, mist, and hand-stitching to draw attention to the title:

Thanks for looking at my page; if you're making some school pages right now, try doing some of the things your family does outside of the classroom that involves learning!
Labels:
big picture scrapbooking,
GCD Studios,
stamping,
techniques
Saturday, October 22, 2011
October visit
Every October my parents come to visit from Maine. Their visit is at an end, and they head home tomorrow. We will miss them.
I made the following page for my mom to take home with her (next month is her birthday):

I used a favorite photo of my mother's that I took at the State Fair this August. I also used September's Studio Calico kit Glee Club. Lots of happy colors on this one.

I played around a little with punches, specifically the EK Success Swiss Cheese punch, which I haven't used enough:

I also punched little bits of patterned paper using a 1/4 " circle punch to fit in some of the holes; other holes I filled with gems or brads.

Just for fun, I added some random cross-stitches, which are a current favorite accent of mine. I also "in-lined" the letter stickers with a Zig Millenium fine gauge pen to make the letters stand out more.
I've been working hard on two things: some design work for GCD Studios, and grading papers. I'll show you some other smaller projects I've worked on this month in the next week.
Coming soon: A trip to the October Afternoon Warehouse Sale, plus a giveaway!
I made the following page for my mom to take home with her (next month is her birthday):

I used a favorite photo of my mother's that I took at the State Fair this August. I also used September's Studio Calico kit Glee Club. Lots of happy colors on this one.

I played around a little with punches, specifically the EK Success Swiss Cheese punch, which I haven't used enough:

I also punched little bits of patterned paper using a 1/4 " circle punch to fit in some of the holes; other holes I filled with gems or brads.

Just for fun, I added some random cross-stitches, which are a current favorite accent of mine. I also "in-lined" the letter stickers with a Zig Millenium fine gauge pen to make the letters stand out more.
I've been working hard on two things: some design work for GCD Studios, and grading papers. I'll show you some other smaller projects I've worked on this month in the next week.
Coming soon: A trip to the October Afternoon Warehouse Sale, plus a giveaway!
Labels:
GCD Studios,
scrapbooking,
Studio Calico,
techniques
Wednesday, April 27, 2011
Project 12 March 2011
Easter weekend was productive for me scrapbooking wise. That was aided by rain that prevented me from gardening. Here's my page for Project 12:
I used Studio Calico's kit Into the Woods. I didn't have enough yellow paper for the outside paper, so I pieced together scraps. If you look close on the top right, you'll see it. Again, I used the Becky Fleck sketch:
I kept pretty true to the sketch, though I added stuff. I always do.
I thought the wood paper might be too dark? But I liked it, so I kept it. And don't you love my boys hamming it up in the MIA?
The die cut card the title is on had a saying on it. I wasn't ever going to use it that way, so I covered it with patterned paper. And that's me and another Jennifer at the October Afternoon warehouse sale. RAK to come...
This might be my favorite part of the page: my button sun! Some die cut and sticker and rub-on clouds.

My other favorite: The kite. I used an October Afternoon sticker, but I didn't like some of the blues on the kite, so I added paper to two quadrants. I also made the kite semi-dimensional with, well, dimensional stickers! And just for kicks, I inked around the clouds (got those at the OA sale!) and used dimensionals with those too.
ETA: Sorry, I forgot today's discount for an Ella ebook! Here's the ebook:

And here's the code for $1.00 off: PHOTOTRICKS. Good until May 15th, 2011!
I used Studio Calico's kit Into the Woods. I didn't have enough yellow paper for the outside paper, so I pieced together scraps. If you look close on the top right, you'll see it. Again, I used the Becky Fleck sketch:
I thought the wood paper might be too dark? But I liked it, so I kept it. And don't you love my boys hamming it up in the MIA?
The die cut card the title is on had a saying on it. I wasn't ever going to use it that way, so I covered it with patterned paper. And that's me and another Jennifer at the October Afternoon warehouse sale. RAK to come...
This might be my favorite part of the page: my button sun! Some die cut and sticker and rub-on clouds.
My other favorite: The kite. I used an October Afternoon sticker, but I didn't like some of the blues on the kite, so I added paper to two quadrants. I also made the kite semi-dimensional with, well, dimensional stickers! And just for kicks, I inked around the clouds (got those at the OA sale!) and used dimensionals with those too.
ETA: Sorry, I forgot today's discount for an Ella ebook! Here's the ebook:

And here's the code for $1.00 off: PHOTOTRICKS. Good until May 15th, 2011!
Labels:
Ella,
project 12,
scrapbooking,
Studio Calico,
techniques
Tuesday, April 26, 2011
CK peeps weekend

A couple weekends ago I went to Scrapbooks Too in Bloomington to scrap with my CK peeps! We had a terrific time. I was so glad to meet them IRL, and they are just as nice and funny as they are on the boards!
Here's a few of the pages I worked on then (click on images to see them larger):
I did the stamping and embossing at the crop, but I'd started the page at home. This is a little more technique heavy than I normally do. The stamped image is the yellow bubble border, which looks a little like patterned paper. And I love my cat in this photo. Doesn't she look wistful...
Like the last page, I started this page at home and did the stamping and embossing at the crop. The yellow bubbles are an embossed stamp. And I love the play on words in the title, "Co(s)mic Justice." I also felt great using older papers.
Just for info sake, the photo was blurry, so I used a 70's action on it--I think it was Pioneer Woman?
This one I made completely at the crop, my last page that I made out of Studio Calico's December kit. I made myself use the two pieces of the Making Memories Christmas paper, neither one of which I liked as they were--too busy!--but when 80% of the paper is covered by photos, it looks pretty good!I like how I used the envelope on the side to house the title. To make the letter stickers stand out on the polka dots, I used a Jenni Bowlin Paint Dauber to cover the pattern a little. Those daubers are my new favorite toys.
Another one I started at home. I added the complementary paper strip on the bottom to balance the top.
This page I started at the crop and finished at home. I used the WRMK line "Maple Grove," which I won through a Scrapbook and Cards drawing for Project 12. LOVE that line. Unfortunately, I ran out of the brown woodgrain, so I used an orange woodgrain on the second page, then added a border trim on the bottom of each to balance it and make it look purposeful. And check out what ancient supply I cracked open on the rub-ons:
Yes, that's white flock. I used my clear glue pen and just sprinkled that all over the cloud. Clouds should be fluffy...And for some fun...

Ella spring training starts this week! You can still join in the fun by going here. And you can participate in challenges on the Ella blog! And just for being you and reading this whole post, you get coupon codes for $1.00 off the above ebooks! (I am posting two codes today because I forgot to post yesterday. My bad. You may have to go through two transactions, but these books are worth it!) The code for 20 Simple Secrets of Happy Scrapbookers is HAPPYSPRING and the code for Journaling that Matters is HAPPYJOURNAL. Hurry, the codes are good through next May 15th!
Labels:
Club CK,
Ella,
scrapbooking,
stamping,
techniques
Monday, July 5, 2010
Summer boys
(A note from yesterday's post: when I want to print journaling strips rather than a block, I space them 1.5. It's the perfect spacing for trimming. I read that on a MB sometime.)
My boys are my favorite scrapping subjects. I especially love to scrap their relationship together. Here are two such layouts I made this weekend, both with Studio Calico's kit Partly Sunny:
This first one was motivated by the boys' fighting last week. Too much time together, I think. I used last week's Studio Calico sketch as inspiration. I love mixing patterned paper like this. There were a couple pieces I took out (another blue and green) and a few more (yellow, especially) I added in. Mixing patterned paper involves trial and error, but using similarly sized patterns and similar artistry helps--none of these patterns are distressed, e.g.
The next one was a photo from our trip to Idaho for Phebe's memorial service. We took the boys to a park to play. It had a ball field and one stray ball, and the boys proceeded to invent a game without bats. They were wearing the University of Idaho t-shirts we'd gotten them, and Dominic commented on them; I put the conversation on the page. I'm annoyed that I zig-zagged unevenly, but I'm trying to tell myself that the boys will not care. Well, Dominic might.
A note about taking photos of my layouts: I have a flat, dark ottoman in the living room that I lay them on (you can see it a little in the Idaho Brothers LO). It is next to a western window, so as long as I take a photo before sunset, the lighting is nice and diffused. I stand directly about the LO and move the camera until it appears straight; I don't zoom, but I do move my camera closer. Then I hold my upper arms by my body to be as still as possible and snap. If it is still a little crooked when I download the photo, I use a custom rotation--.7 usually does it.
My boys are my favorite scrapping subjects. I especially love to scrap their relationship together. Here are two such layouts I made this weekend, both with Studio Calico's kit Partly Sunny:
This first one was motivated by the boys' fighting last week. Too much time together, I think. I used last week's Studio Calico sketch as inspiration. I love mixing patterned paper like this. There were a couple pieces I took out (another blue and green) and a few more (yellow, especially) I added in. Mixing patterned paper involves trial and error, but using similarly sized patterns and similar artistry helps--none of these patterns are distressed, e.g.
The next one was a photo from our trip to Idaho for Phebe's memorial service. We took the boys to a park to play. It had a ball field and one stray ball, and the boys proceeded to invent a game without bats. They were wearing the University of Idaho t-shirts we'd gotten them, and Dominic commented on them; I put the conversation on the page. I'm annoyed that I zig-zagged unevenly, but I'm trying to tell myself that the boys will not care. Well, Dominic might.A note about taking photos of my layouts: I have a flat, dark ottoman in the living room that I lay them on (you can see it a little in the Idaho Brothers LO). It is next to a western window, so as long as I take a photo before sunset, the lighting is nice and diffused. I stand directly about the LO and move the camera until it appears straight; I don't zoom, but I do move my camera closer. Then I hold my upper arms by my body to be as still as possible and snap. If it is still a little crooked when I download the photo, I use a custom rotation--.7 usually does it.
Labels:
big picture scrapbooking,
photography,
techniques
Subscribe to:
Posts (Atom)