The last time I posted, I shared some single pages, smaller ones. Today I'm sharing something that's maybe a little trickier but perhaps more satisfying for me, two-page layouts.
On the design team for Simple Scrapper, we seldom get two-page designs. Still, it's one of the members' most favorite inspirations, so I try to use two-page designs as much as I can.
This first was a glorious, two-page sketch. I didn't have to do much--I subbed the journaling blocks for photos and added an embellishment/journaling cluster. It was a lot of fun digging through my word stash for the left side.
Next is a manufactured two-page layout, recording the story of our epic winter last year, which may have been the start of memes overtaking photos on my phone.
I say manufactured because I put together two single-paged sketches to create this spread. To do this successfully, you need two contrasting sketches, then pick something to unite the pages: Color, embellishments, paper (see my curves and snowflakes).
Instead of contrasting two sketches, you can also do what I did with a layout I recently posted: take one sketch and stretch it over two pages.
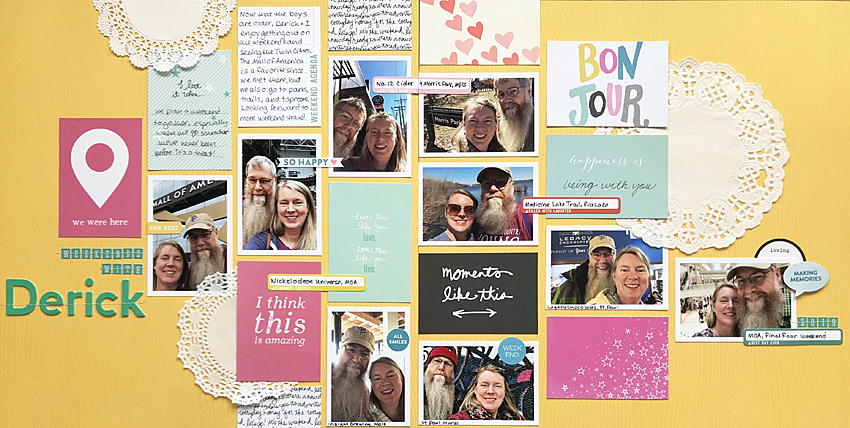
Here the left side was the sketch; I sort of mirrored/tapered it on the right side. Again, similar colors and products.
Thank you for stopping by! Hopefully this gave you ideas for scrapbooking two-page layouts.
Showing posts with label two-pages. Show all posts
Wednesday, April 15, 2020
Friday, April 10, 2020
Scrapbooking across two pages
Hello! I've been putting together some two-page layouts with lots of photos. I thought I'd share some of them.
First, here's a page about my father-in-law's funeral two-years ago:
Here I did what I typically do when I have a lot of photos: I print them in standard sizes, in this case, 3x4. It made the most sense to line them up across the page, so I did. That left two spots for the journaling. For embellishments, I took inspiration from the flowers next to the flag and I used my Stampin' Up! punches with scraps to make the flowers.
Next is a page about a camping trip last year:
This is one of my favorite sketches from Simple Scrapper: a triangular grid of Project Life cards. However, I'd printed my photos as wallets, smaller than PL! So I trimmed the PL cards to match the wallets. The background paper is one I love from Lawn Fawn. I have bought so much of it. It makes me happy.
Thank you for visiting! I hope this gave you ideas about incorporating multiple photos on two-page layouts.
First, here's a page about my father-in-law's funeral two-years ago:
Here I did what I typically do when I have a lot of photos: I print them in standard sizes, in this case, 3x4. It made the most sense to line them up across the page, so I did. That left two spots for the journaling. For embellishments, I took inspiration from the flowers next to the flag and I used my Stampin' Up! punches with scraps to make the flowers.
Next is a page about a camping trip last year:
When I scrapbook a trip where I took some good vista shots, I print one big with the idea I'll use that on one page, then fill the other with smaller shots. I did that here, but you can see the photos don't fill the space in an even grid. I struggled with that for a while and thought about reprinting the photos as squares to make an even grid, but the orientation of the photos just didn't work. Taking a shot of the whole family manes I have to print it horizontally! Instead, I added a line of embellishments in between. I'm happy with the result. Most of the camping supplies come from my Camping Iris container, and most were Simple Stories, though the lovely coral paper was Pebbles.
Finally, here's a page I did for March Simple Scrapper:
This is one of my favorite sketches from Simple Scrapper: a triangular grid of Project Life cards. However, I'd printed my photos as wallets, smaller than PL! So I trimmed the PL cards to match the wallets. The background paper is one I love from Lawn Fawn. I have bought so much of it. It makes me happy.
Thank you for visiting! I hope this gave you ideas about incorporating multiple photos on two-page layouts.
Labels:
Pebbles,
photos,
Project Life,
scrapbooking,
Simple Scrapper,
Simple Stories,
Stampin' Up!,
two-pages
Tuesday, March 27, 2018
Scrapbooking the same event in a new way
Many of the pages I make involve my family attending an event we got to every year. I struggle at times with the design--should I try to make it different or not? Most of the time I keep some things the same and switch the rest up. Here's an example of a page I made about our family attending the State Fair:
I always take a ton of photos at the state fair. I am sort of amazed I got it cut to 7 photos. The same: the big photo of the swing ride that I always take and I usually enlarge and highlight the boys in some way.
For this layout, I used the January Studio Calico kit. I liked the combo of bright and delicate elements, which I thought would work well for this subject.
Here's some details, starting with the stitched circle of the boys:
I clustered a bunch of tags and stickers, layering them with dimensional stickers for greater interest.
Throughout I also added some sequins from my stash. I liked how they sort of look like candy sprinkles, the kind you will find at the fair.
So in scrapbooking the same event, don't shy away from doing it the same way. Keep your favorite design elements from previous pages, and feel free to adopt what you need to fit the design. And don't be afraid of scrapbooking just a few photos!
Labels:
scrapbooking,
stitching,
Studio Calico,
two-pages
Monday, March 5, 2018
Scrapbooking the art of film
Hello! The month of February came and went pretty fast. I did a lot of scrapbooking, so I wanted to start sharing what I did.
This next layout I wanted to share since its inspiration, Guillermo del Toro won the Oscar last night. We've seen some of his films, and last year an exhibit of his personal art and inspiration went on exhibit at the Minneapolis Institute of Art. The boys and I got tickets and went, and it was worth every penny. Here's the page:
The walls in the exhibit were bright, bloody red, and the ceiling was black, so I chose that for my page. I dug into my Halloween stash for nondescript creepy and somewhat amusing products--since so much of his work is comic inspired, the whimsical items seemed appropriate.
A lot of the things in the exhibit were things you did not want to turn your back on. For example, those eyeballs in the entrance gateway blinked. The boys didn't want to stand in front of them because they could hear them closing and opening. The H.P. Lovecraft statue looked real, which was really unsettling too.
Another uncomfortable turning-our-backs moment: that hologram in the lower right. Yikes.
Here's some close-ups of the embellishment clusters in particular:
Those flair buttons my husband got me when he traveled to London and visited the Globe theater; they mostly reference the Scottish play, which starts with witches, so I loved using them on this page.
This photo might be my favorite. I'm glad I captured the boys underneath the arm of the Pale Man. It just looks cool.
I used a lot of Pebbles (the chalk speech bubble), October Afternoon (labels and brads), 7Gypsies (vintage stickers), and Bella Blvd (most words and cute images).
To create the design, I added the strips on the bottom, then created the photo collage on the right. I had many fewer photos on the left, so I arranged them the best way I could, leaving space for title and journaling.
And that is my creepy page of creepy photos from a fun time at the art museum. And congratulations to Guillermo del Toro for his Oscars win!
This next layout I wanted to share since its inspiration, Guillermo del Toro won the Oscar last night. We've seen some of his films, and last year an exhibit of his personal art and inspiration went on exhibit at the Minneapolis Institute of Art. The boys and I got tickets and went, and it was worth every penny. Here's the page:
The walls in the exhibit were bright, bloody red, and the ceiling was black, so I chose that for my page. I dug into my Halloween stash for nondescript creepy and somewhat amusing products--since so much of his work is comic inspired, the whimsical items seemed appropriate.
A lot of the things in the exhibit were things you did not want to turn your back on. For example, those eyeballs in the entrance gateway blinked. The boys didn't want to stand in front of them because they could hear them closing and opening. The H.P. Lovecraft statue looked real, which was really unsettling too.
Another uncomfortable turning-our-backs moment: that hologram in the lower right. Yikes.
Here's some close-ups of the embellishment clusters in particular:
Those flair buttons my husband got me when he traveled to London and visited the Globe theater; they mostly reference the Scottish play, which starts with witches, so I loved using them on this page.
This photo might be my favorite. I'm glad I captured the boys underneath the arm of the Pale Man. It just looks cool.
I used a lot of Pebbles (the chalk speech bubble), October Afternoon (labels and brads), 7Gypsies (vintage stickers), and Bella Blvd (most words and cute images).
To create the design, I added the strips on the bottom, then created the photo collage on the right. I had many fewer photos on the left, so I arranged them the best way I could, leaving space for title and journaling.
And that is my creepy page of creepy photos from a fun time at the art museum. And congratulations to Guillermo del Toro for his Oscars win!
Labels:
7gypsies,
Bella Blvd,
October Afternoon,
Pebbles,
scrapbooking,
two-pages
Monday, February 19, 2018
Two-page layouts: really big and really small
This is the final two-page layout I made this past month. This one I knew I would be pairing a big photo with small ones. The big photo involved my son at the starting line of a cross country race. Without a big photo my son would have been lost. Here's what I did:
Like the previous layouts, I had saved autumn die cuts. I then picked out some autumn hued papers that matched the die cuts and then spread it across the page. Here's the details:
Like before, I used Elle's Studio die cuts, plus elements from my Ali Edwards kits and Stampin' Up! Project Life kits.
Here's an interesting note: I had originally designed the page with the pages reversed, but my son said he preferred the pages reversed, and so I did it. It's his memory, after all.
Thank you for visiting while I share these two-page layouts I made this past month! Soon I'll share my Simple Scrapper pages for March. They are some of favorite ever. I can't wait to share them!
Like the previous layouts, I had saved autumn die cuts. I then picked out some autumn hued papers that matched the die cuts and then spread it across the page. Here's the details:
Like before, I used Elle's Studio die cuts, plus elements from my Ali Edwards kits and Stampin' Up! Project Life kits.
Here's an interesting note: I had originally designed the page with the pages reversed, but my son said he preferred the pages reversed, and so I did it. It's his memory, after all.
Thank you for visiting while I share these two-page layouts I made this past month! Soon I'll share my Simple Scrapper pages for March. They are some of favorite ever. I can't wait to share them!
Labels:
Ali Edwards,
Elle's Studio,
Rowan,
scrapbooking,
Stampin' Up!,
two-pages
Saturday, February 17, 2018
Two-page layouts: Products, memorabilia, and a grid
For the past month, I have scrapped several two-page layouts. I shared one the other day. Today I wanted to share the next page I made.
Like the last layout, I started with autumn die cuts I had pulled as I sorted and color-coded my die cuts. This time All of my photos but one were the same size, so I picked a couple pieces of patterned paper from my scraps as background and set the photos up as a grid. Here it is:
This commemorates a trip to a local orchard with a cider house. While we were there, we enjoyed the sights and tastes, but the boys particularly loved the scavenger hunt for the gnomes all around the barn. Each gnomes had a shaped punch (scrapbooking tools--hooray!) that they used on their game card, and the completed card earned them free apples. Nice! I made sure to put the cards on the page.
Here's a closer look:
To enclose the memorabilia, I adhered the die cut with dimensional stickers to tuck the cards behind.
Like the last layout, I started with autumn die cuts I had pulled as I sorted and color-coded my die cuts. This time All of my photos but one were the same size, so I picked a couple pieces of patterned paper from my scraps as background and set the photos up as a grid. Here it is:
This commemorates a trip to a local orchard with a cider house. While we were there, we enjoyed the sights and tastes, but the boys particularly loved the scavenger hunt for the gnomes all around the barn. Each gnomes had a shaped punch (scrapbooking tools--hooray!) that they used on their game card, and the completed card earned them free apples. Nice! I made sure to put the cards on the page.
Here's a closer look:
To enclose the memorabilia, I adhered the die cut with dimensional stickers to tuck the cards behind.
About the gnomes: they came from Pebbles die cuts, I believe. When I saw them, I set them aside to use on this page. The apples I cut from Bella BLVD and adhered with dimensional stickers. Lots of die cuts from Elle's Studio too.
Thank you for visiting! I hope this gives you some inspiration in scrapping an event photo layout. Back soon with another two-page layout!
Labels:
autumn,
Bella Blvd,
Elle's Studio,
embellishments,
Pebbles,
scrapbooking,
two-pages
Thursday, February 15, 2018
Two-page layouts: starting by sorting
Hello! I have spent the last month with several tasks. Professionally, I read many student arguments, commented on them, and conferenced with the students. I also have a student teacher, who is doing fine work. Personally, I visited my home to see my dad, who is in rehab after a stroke two months ago. While there (and stuck in Detroit because of our mammoth snow in Minnesota on my way home!) I read a few books: Arcadia, The Art Forger, and Underground Airlines (I'm in the middle of four more: Rabbit, The Snow Child, V is for Vengeance, and The Ladies' Room). I also scrapped, more slowly than I wished. Here I'd like to share a bit of what I did.
First: I scrapped autumn photos, most of which were two-page layout amounts. I liked scrapping these warm photos in this bitterly cold month! To prepare, I sorted my die cuts into a hanging file holder by color. When I saw dies that were autumn themed, I put them aside to use on these autumn spreads. Here's the first one I made:
The autumn dies I put aside to use were the Elle's Studio journaling tag, the Pebbles circle and hearts, and the words. My son picked out the background paper, which was nice. I think he did a good job of selecting paper for this walk in the arboretum. Here's some closer looks:
I picked the Voluptate font for the title because it matched the die cut words so well. Looking back, I wished I'd adhered the FAMILY a bit lower, but it's fine as it is.
And that's my first of three two-page layouts! All of them started by my sorting and putting aside die cuts that were autumn themed. Later this week I'll share the rest of the pages, plus some news about an exciting restart in the crafting world!
First: I scrapped autumn photos, most of which were two-page layout amounts. I liked scrapping these warm photos in this bitterly cold month! To prepare, I sorted my die cuts into a hanging file holder by color. When I saw dies that were autumn themed, I put them aside to use on these autumn spreads. Here's the first one I made:
The autumn dies I put aside to use were the Elle's Studio journaling tag, the Pebbles circle and hearts, and the words. My son picked out the background paper, which was nice. I think he did a good job of selecting paper for this walk in the arboretum. Here's some closer looks:
I picked the Voluptate font for the title because it matched the die cut words so well. Looking back, I wished I'd adhered the FAMILY a bit lower, but it's fine as it is.
And that's my first of three two-page layouts! All of them started by my sorting and putting aside die cuts that were autumn themed. Later this week I'll share the rest of the pages, plus some news about an exciting restart in the crafting world!
Labels:
die cutting,
Pebbles,
scrapbooking,
Silhouette,
two-pages
Wednesday, January 10, 2018
Documenting Christmas cards
Every year I save the Christmas cards with photos and turn them into a layout. I have albums just for Christmas pages, and I put them in there. I've been behind lately. Here's the pages I worked on over winter break:
This first one was complete, until I got a few late cards. I added a 6x12 page with the remaining photos. I keep my themed products (Christmas, camping, travel, Halloween, school) in Iris containers, so I fortunately still had the green paper for the bottom. I had no more of the plaid on the upper right, so I found a similar plaid and used it.
This next page came from two years ago (I was behind!). I have a TON of Christmas products--many years on design teams guaranteed lots of product--but I still got the new Christmas line from Stampin' Up!, the one with blacks and greens. I added silver and touches of red from other Christmas lines I had.
I also made the pages for 2017 as well, but I'm holding on to see if I have any late cards before posting them and putting them in albums.
This first one was complete, until I got a few late cards. I added a 6x12 page with the remaining photos. I keep my themed products (Christmas, camping, travel, Halloween, school) in Iris containers, so I fortunately still had the green paper for the bottom. I had no more of the plaid on the upper right, so I found a similar plaid and used it.
This next page came from two years ago (I was behind!). I have a TON of Christmas products--many years on design teams guaranteed lots of product--but I still got the new Christmas line from Stampin' Up!, the one with blacks and greens. I added silver and touches of red from other Christmas lines I had.
I also made the pages for 2017 as well, but I'm holding on to see if I have any late cards before posting them and putting them in albums.
Labels:
Christmas,
scrapbooking,
Stampin' Up!,
two-pages
Saturday, August 19, 2017
August pages for Simple Scrapper:
Going on vacation last month made me remiss in sharing my Simple Scrapper pages. These two were among my recent favorites. Here's the first:
Last summer both of my boys went to day camp at Leonardo's Basement, a fantastic place in Minneapolis that mixes science and art and socializing. Since it was a summer event, I used my summer products. I've started digging into my patterned paper for the backgrounds and my Project Life cards for the smaller pieces of patterned paper.
Most of the embellishments come from the Crate Paper line called The Pier.
Next is a page about technology, specifically the changing technology of music throughout my life.
I'm the one in the hat with a necklace.
It's amazing what you can do with a circle punch, patterned paper, and stitching.
Thank you for visiting! Please visit Simple Scrapper to check out their monthly inspiration, including story starters, sketches/templates, monthly magazines, classes, and online community.
Last summer both of my boys went to day camp at Leonardo's Basement, a fantastic place in Minneapolis that mixes science and art and socializing. Since it was a summer event, I used my summer products. I've started digging into my patterned paper for the backgrounds and my Project Life cards for the smaller pieces of patterned paper.
Most of the embellishments come from the Crate Paper line called The Pier.
Next is a page about technology, specifically the changing technology of music throughout my life.
I'm the one in the hat with a necklace.
It's amazing what you can do with a circle punch, patterned paper, and stitching.
Thank you for visiting! Please visit Simple Scrapper to check out their monthly inspiration, including story starters, sketches/templates, monthly magazines, classes, and online community.
Labels:
Crate Paper,
Project Life,
scrapbooking,
Simple Scrapper,
two-pages
Monday, June 12, 2017
Going back in time: Scrapbooking photos across years
Hello! The school year is over. Aside from preparing for the next school year, I am filling my time with gardening, reading, and scrapbooking.
One thing I have done this past month involves scrapbooking photos of my boys across the years. First: I had printed some photos of my boys recently posing next to the statues of Harmon Killebrew and Kirby Puckett outside Target Field. It dawned on my that the boys' heads are now OVER Killebrew's bat where they used to be BELOW them. At that point I realized that, since Target Field opened in 2010, the statues have been our growth charts. And so I made this page:
The two die cuts--the magic is real and the journaling spots--are from the June Simple Scrapper downloads.
Next is a page that I made for Simple Scrapper for July. I had printed these photos of my boys in trees at the Minneapolis Peace Garden, but I didn't know what to do with them. The story starter for July gave me the idea to pair them with older photos of them in trees. Just like trees, these two grow, but not out of this favorite hobby.
The photos were a little dark, especially of Rowan, so the Jellybean Soup frames helped draw attention to them. The basic chipboard pieces from Ali Edwards were the perfect embellishments for this layout.
And then a page about my son and his years of playing violin from kindergarten to today. The recitals at first were in a lounge at an apartment, then for years they were at his teacher's home. Recently they returned to the teacher's apartment, where we can see his growth by the phone on the wall behind him. I printed photos from the past and now to highlight the growth.
Again, I chose bright colors, and I dug into my October Afternoon die cuts to create some bright clusters. The title is from old American Crafts foam letters--and yes, I had run out of an S, so I cut apart an 8.
Thank you for visiting! I have another post to share soon about the boys in my life, including my husband, particularly as we approach Father's Day.
One thing I have done this past month involves scrapbooking photos of my boys across the years. First: I had printed some photos of my boys recently posing next to the statues of Harmon Killebrew and Kirby Puckett outside Target Field. It dawned on my that the boys' heads are now OVER Killebrew's bat where they used to be BELOW them. At that point I realized that, since Target Field opened in 2010, the statues have been our growth charts. And so I made this page:
I used a sketch and story starter from Simple Scrapper to help me with this page. I picked bright primary colors because they make me think of baseball. Here's some closer shots:
The two die cuts--the magic is real and the journaling spots--are from the June Simple Scrapper downloads.
Next is a page that I made for Simple Scrapper for July. I had printed these photos of my boys in trees at the Minneapolis Peace Garden, but I didn't know what to do with them. The story starter for July gave me the idea to pair them with older photos of them in trees. Just like trees, these two grow, but not out of this favorite hobby.
The photos were a little dark, especially of Rowan, so the Jellybean Soup frames helped draw attention to them. The basic chipboard pieces from Ali Edwards were the perfect embellishments for this layout.
And then a page about my son and his years of playing violin from kindergarten to today. The recitals at first were in a lounge at an apartment, then for years they were at his teacher's home. Recently they returned to the teacher's apartment, where we can see his growth by the phone on the wall behind him. I printed photos from the past and now to highlight the growth.
Again, I chose bright colors, and I dug into my October Afternoon die cuts to create some bright clusters. The title is from old American Crafts foam letters--and yes, I had run out of an S, so I cut apart an 8.
Thank you for visiting! I have another post to share soon about the boys in my life, including my husband, particularly as we approach Father's Day.
Subscribe to:
Posts (Atom)


