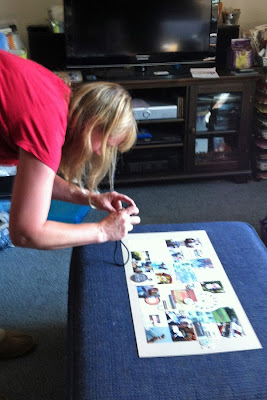
1. I place my page on an ottoman near a west-facing window not near the end of day to photograph it.
I have almost no windows in my house, really, so I must photograph the page before it gets too late and the light too intense. I could place the page on the floor, but I'm a fairly tall woman, so I can get closer when I place it on something. I like the ottoman because it is about 2 feet off the ground: not too high, not too low, with a neutral navy background.
2. I stand directly over it and photograph it.
This is the important step. I have to hold my arms steady at my side and move the camera until the layout is about square in my screen. I then take a couple shots.
3. I get down close to take some details shots.
This is harder for me to hold the camera steady. I could kneel to get closer, but I don't have great knees (many sprains from high school field hockey and torn cartilage from volleyball) so I stand.
4. I fix up the shot in PSE 10 afterwards.
I'll share what I do step by step here:
- If the image is crooked, I straighten it (Image-Rotate-Custom-.5 degrees right or left is usually enough to tweak it a little).
- I crop the photo, unrestricted, to eliminate all background.
- I usually do an Auto Smart Fix under the Enhance menu. Like I said, I tend to have bad light.
- If the page is for a design team, I use the required template. If not, I skip this step and move on to the next.
- The next step is to sharpen the image (if it's on a template, I flatten the image first.) I go to Enhance-Sharpness to do so. I usually keep it set to 85% for an Amount and .8 Radius in pixels. That seems to sharpen the photo nicely without getting too sharp.
- Then I Save As in a file folder--my Fancy Pants Designs pages get stored in a different folder from my personal pages.


Thanks for posting this. I usually scan my layouts, but this would be so much better I think. I'll have to give your instructions a try!
ReplyDeleteThanks for posting your instructions on taking photos of your layouts...you had suggested this in the past, maybe on ClubCK and it has really helped me with mine! Just wanted to say "Thank You" for your great ideas!
ReplyDeleteI have wondered that myself too. As a photography person, I always thought you page shots look excellent. Now I know your magic!
ReplyDelete